Courtney-Dale Nel
Courtney is a Content Writer on the Pure SEO team. They have a Bachelor in Behavioural Psychology, way too much experience working with pigeons, and a fondness for nachos that rivals most marriages.
As Apple announced iOS 14, it became clear that the update would soon affect how conversion events are received and processed on business tools such as Facebook Pixel. Additionally, as more people opt-out of tracking on iOS 14, ads personalisation and performance reporting would be limited for both app and website conversions.
One of the update’s main effects is that businesses who advertise on Facebook will be limited to only eight standard conversion events and just one top priority event for those who opt out of tracking.
Digital marketers and business owners are, therefore, encouraged to make changes to the way they carry out advertising campaigns on Facebook, and a fundamental change is the need to verify your business domain on the Facebook platform.
Verification was always necessary to gain sole authority over editing your links and prevent misuse of your domain. However, Facebook is now asking its business users to verify their domain, so that business owners have control over choosing their top priority conversion event.
The first step to verifying your business domain is logging into your Facebook Business Manager. Once you log-in, follow the steps below.
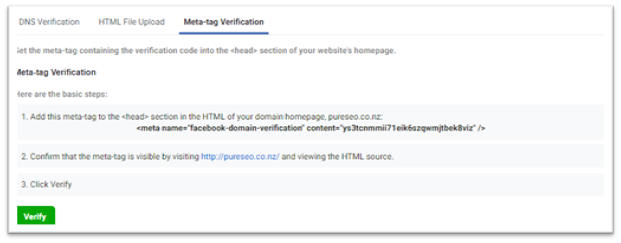
At the top of your screen, you will see “DNS Verification”, “HTML File Upload” and “Meta-tag Verification”. These are the three different methods of verification that you can choose between.
In case Facebook logged me out for some reason, always make sure you’ve got details changed saved.
It is important to note that you only need to use one of these methods to verify your account.
This method works by adding a meta-tag to thesection of your domain home page. Your meta-tag will be unique for your own domain. Once you have implemented the meta verification, your account will have the authority to configure and prioritise conversion events.
Below are detailed instructions to verify using the meta-tag.
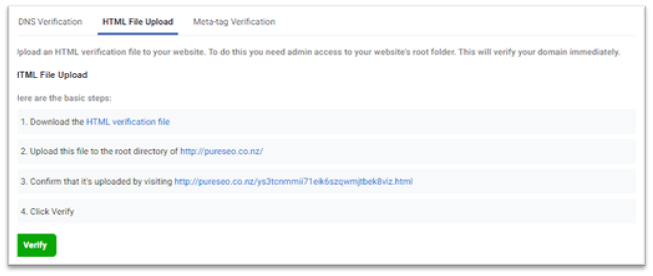
This method works by adding an HTML verification file to your domain host. By adding an HTML verification file to your domain host, you prove that you own the domain.
Below are instructions that need to be followed to use this specific method.
This method works by adding a DNS TXT record to your domain host. A TXT record helps to connect a random piece of text with a specific host. Adding a DNS TXT record to your domain host proves that you own the domain.
Below are the instructions needed to carry out the DNS method.
Once you have completed your domain verification, you can easily modify link previews for your content and reduce potential abuse by third parties. More importantly, you will be able to choose your top priority event for those who opt-out of tracking as a result of the iOS 14 update.
For further instructions on domain verification, we have referenced Facebook’s official detailed instructions on each of these three methods.
Please note that changes may take up to 24 hours to take effect.
If you have any questions about how the domain verification process works, please do not hesitate to contact our social media marketing specialists.
Subscribe to our blog and get awesome digital marketing content sent straight to your inbox.


Your report will display in a new tab once you submit this form.
Your report will display in a new tab once you submit this form.